Temporal Workflow Engine Overview, Demo, and Evaluation
Introduction
Hello, in this article I would like to introduce Temporal, an open-source Workflow Engine that supports Java, Go, Python, TypeScript, and many other languages, and talk about its capabilities. I will also briefly cover possible use cases, its strengths and weaknesses, its alternatives, and which tools it can serve as an alternative to.

Temporal is a workflow engine. But what is a workflow engine? Simply put, workflow engines are systems that manage and execute digital business processes, persist these processes using a database, and provide reporting capabilities.
Temporal, which has alternatives such as StackStorm, Zeebe, Airflow, and Windmill, stands out from other engines by offering simplicity, durability, and strong execution guarantees. (Different alternatives can be reviewed at this link: alternatives). In addition, its documentation is very clear and well-structured (Temporal documentation).
Temporal Components
A Temporal application basically consists of three components.
Temporal Service (Server): The program responsible for running and managing your workflows can be thought of as the main orchestrator. It decides which worker will take which task, provides an interface, and handles the database connection. Both self-hosted and cloud service options are available.
Temporal Worker: The service that actually executes your workflows. These are the programs where your processes and business rules are implemented.
Temporal SDK: The library that supports your chosen programming language and that you will use for development.
In our application, for the sake of simplicity, we will run a Temporal Service locally, but deployment options for different environments can also be explored (deployment options).
Now let’s take a look at what a sample Temporal Worker executes using the Temporal SDK.
A Temporal Worker is essentially responsible for executing workflows, which are referred to as Workflows. These workflows can be composed of smaller units called Activities.
Workflow is written in the programming language you choose and generally defines the overall flow of the application.
Activity contains application logic that is likely to fail, such as calling an external service, and represents parts that can be retried multiple times.
In other words, a Worker holds the code for the Workflows and Activities we create and is responsible for executing the related tasks.
In addition, to run the Workflows we create, we usually need a Client application. This part can also be handled via unit tests if desired. Simply put, it can be considered a trigger mechanism.
Temporal Architecture
Before moving on to the implementation, I would like to briefly talk about the Temporal architecture. Architecturally, Temporal consists of multiple independent services working together. These services communicate with each other and require persistent storage to store certain data. Each of these services has specific responsibilities.
These services are:
- Worker Service: Responsible for executing the workflows defined for the Temporal cluster.
- Frontend Service: Acts as the entry point for all requests coming into the Temporal cluster. It receives requests from all clients and routes them to the appropriate service.
- History Service: Responsible for owning workflows and their states. Tracking every state change within a workflow is handled by this service.
- Matching Service: Responsible for dispatching the relevant workflows and activities to available worker services.
In addition to these services, we need Worker services to actually execute our workflows. This is because Temporal does not directly execute the workflows and activities we define; instead, it plans and manages their execution by delegating them to the worker services we implement. Our worker services query the Temporal service to determine which workflows and activities they should execute.
For those who want to learn more about Temporal’s architecture in greater detail, I’m leaving the link to this article written by Sanil Khurana.
Before moving on to the coding part, I would also like to briefly talk about Temporal UI capabilities.

After running the Temporal service locally or in a cloud environment, it provides us with a user interface where we can view workflows, connect to different namespaces, and manage authentication and authorization. Through this interface, we can see ongoing or completed workflows and apply filters. We can also inspect workflow details and see which workers are connected to which task queues.
Temporal Demo
Now let’s create an order Temporal Workflow for an e-commerce system and see how these components work together.
The workflow I designed will consist of the following parts:
- Backend Application — the workflow client (starting point); the process begins with a customer purchase.
- Orchestrator Service — the worker responsible for managing the order created by the backend application.
- Inventory Service — the worker responsible for stock-related operations.
- Payment Service — the worker responsible for payment processing.
Let’s assume that, in an e-commerce system, a customer places an order. This order first reaches our backend service, and the backend service starts the Order workflow. The inventory service performs stock checking and deduction, the payment service processes the payment, and the operation is completed. In real life, there are additional processes such as shipping, but I am excluding them for the sake of simplicity in this demonstration. Those who wish can extend the project as they like.
As mentioned, we will complete the process using child workflows under a main workflow. Of course, to simplify the demonstration, we will shorten some steps. Additionally, these operations could have been designed as activities under a single main workflow, but based on my review of other projects, this approach is generally not recommended. Therefore, our main order workflow will create child workflows for the relevant operational steps. All the code is available on my GitHub account for those who are interested.
Now let’s move on to the implementation part, but first, let’s spin up the Temporal server that we will use for demo purposes.
| |
With this command, we start the development server. After the server is up and running, the UI also becomes available at http://localhost:8233.
1. Backend Service
The backend service is implemented in Java to simulate the first point in the e-commerce operation where an order arrives from the frontend service.
To keep this step brief, we will add the Temporal dependency to any Spring Boot project. A POST request sent to the order endpoint will then start our workflow.
| |
| |
Our backend application is configured to connect to the local Temporal service, although we could also connect to Temporal Cloud if desired. For ease of demonstration, we chose to connect to the local service.
| |
Görüldüğü üzere gayet kısa bir Controller, tek vasfı Temporal servisi objesine gelen siparişi startOrder fonksiyonu ile iletmek ve asenkron sipariş işlemini kabul ettiğini gösteren 202 kodunu dönmek.
| |
The startOrder function inside the Temporal service simply sends a new OrderWorkflow to the HLC_TRADING_ORDERS task queue. While doing this, it generates a random ID. We can populate the ID however we like, or, if we prefer, let Temporal generate a random ID for us.
The entry point of the workflow is the function named fulfill. The key point to note here is that the signature of OrderWorkflow must be known by this service. Could the service call a workflow whose signature it does not know? It could. This distinction is handled by typed and untyped WorkflowStubs. Untyped WorkflowStubs provide a more flexible structure, while typed WorkflowStubs are more convenient because they allow direct invocation of functions such as @WorkflowMethod, @QueryMethod, and @SignalMethod. In both approaches, workflows can be invoked synchronously or asynchronously.
From this point on, the Orchestrator worker listening to the HLC_TRADING_ORDERS task queue will take over.
2. Orchestrator Service
The orchestrator service is implemented in Java to simulate the step of managing the “workflow” in the e-commerce operation.

Within the orchestrator service’s fulfill workflow, it will first call the inventory service’s doStock function, which is responsible for verifying the order’s stock status. If this step completes successfully, it will then call the payment service’s doPayment function. Each of these operations is executed using the mechanism that allows creating a new workflow within a workflow, known as a child workflow.
Temporal also provides the capability to manage these processes in case of failures, but for the sake of keeping the demo concise, I did not include those parts. For child workflows, IDs can be provided, and they can be executed either synchronously or asynchronously. The inventory service listens to the HLC_TRADING_ORDERS_STOCK task queue, while the payment service listens to the HLC_TRADING_ORDERS_PAYMENT task queue.
| |
3. Stock Service
The inventory service is implemented in Java to simulate the steps of checking and deducting stock in the e-commerce operation.

| |
Within this service, I created one main workflow with two activities. In simple terms, it takes the Order model and simulates deducting the stock if the relevant product is available. There is no real database connection.
| |
Retry Options
As mentioned earlier, Temporal provides execution guarantees for our activities and workflows even when failures occur. How these failures are handled can be configured using RetryOptions. With this model, we can define answers to questions such as how many times an activity can be retried, what its maximum execution time should be, or which errors should prevent the activity from being retried. I especially recommend explicitly setting the setMaximumInterval value. Otherwise, the smallest unnoticed error or condition may cause a process to run indefinitely unless it is deliberately terminated. This would result in additional costs and customer dissatisfaction.
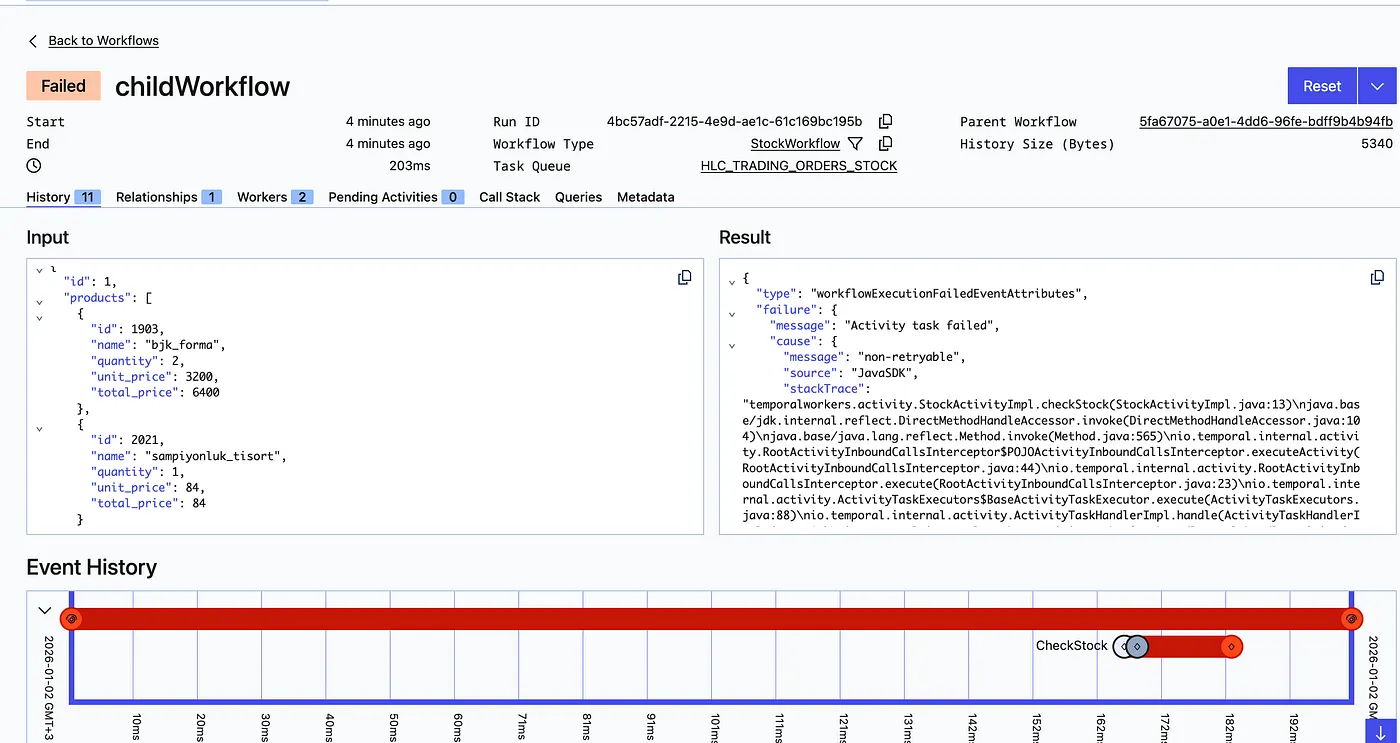
Within the inventory service, I marked the CheckStockException thrown by one of the two activities as a non-retryable exception. For retryable errors, I set the maximum retry count to 4. In short, this means: if a CheckStockException occurs, the activity fails immediately. Any activity can run for a maximum of 10 seconds, and a failing activity can be retried up to 4 times (unless the error is CheckStockException).
To verify that these features work correctly, I created two test orders. One is designed to throw a CheckStockException and therefore fail, while the other throws a DecreaseStockException and is retried. The function that throws DecreaseStockException is implemented to fail twice and succeed on the third attempt:
| |
If we had changed the condition from currentAttempt <= 2 to currentAttempt <= 3, we would then hit the setMaximumAttempts(4) limit instead.

Here, on the Temporal service’s workflow summary screen, we can see two OrderWorkflow instances and two child StockWorkflow instances. The failed child workflow caused the corresponding OrderWorkflow to fail as well, because it threw a CheckStockException.

The successful child workflow threw a DecreaseStockException twice. Since this error is retryable and the retry count was below the limit of 4, it was retried a third time and completed successfully.

I deliberately terminated the main OrderWorkflow via the Web UI, because it had progressed to the Payment Worker stage and the implementation of that service was not yet complete. Now let’s move on to our other service, the Payment Worker service.
4. Payment Service
The payment service is implemented in Go to simulate the payment process in the e-commerce operation.

The workflow within the payment service contains three activities: fraud risk checking, payment processing, and notification handling.
| |
Asynchronous Activities
Within our workflow, we will invoke these operations asynchronously. This allows us to save resources by running activities that do not need to wait for each other at the same time. This structure is provided by the Future abstraction when executing activities. In our previous activity invocations, we used a synchronous approach and waited for the previously called activity to complete before moving on to the next step. With this approach, we can trigger the desired activities immediately and evaluate their results later.
| |
To test the structure we designed, I created two orders, and the results are as follows:
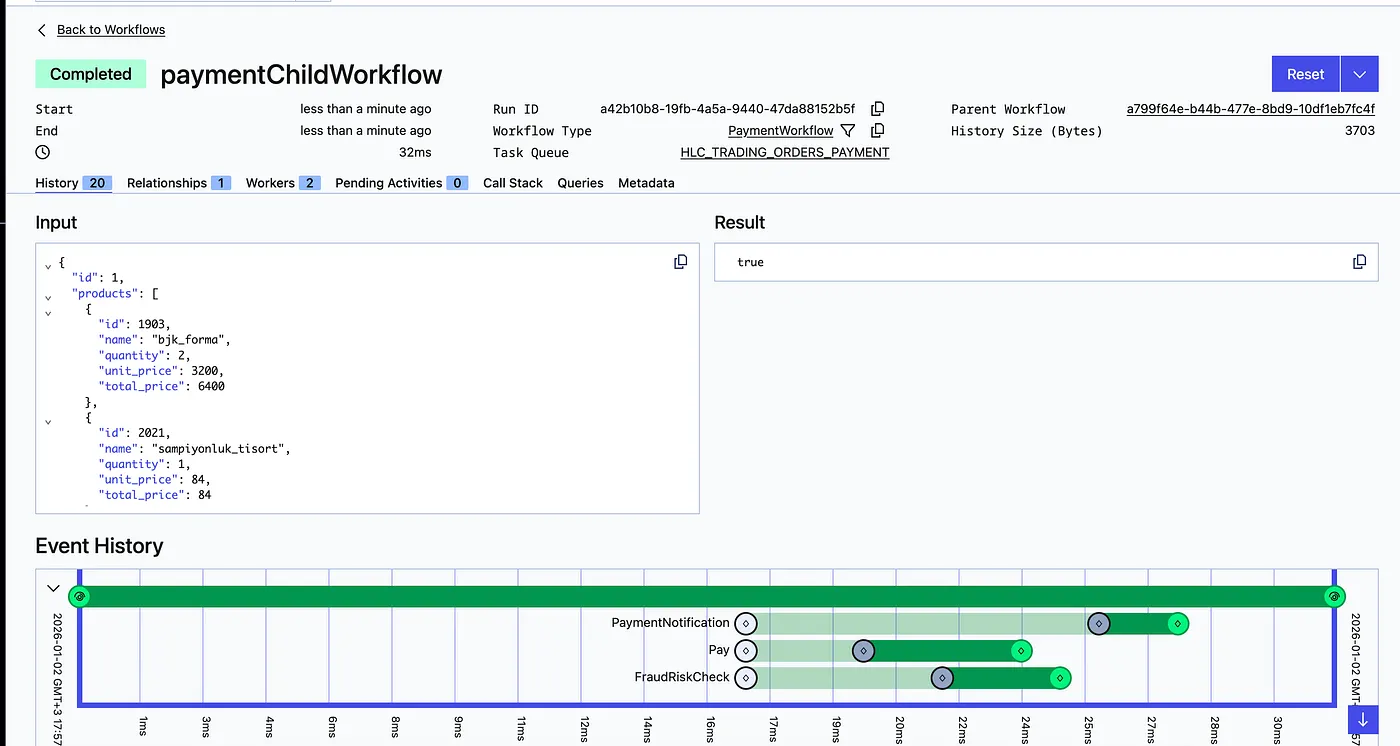

The differences in the random waiting times within the activities can be observed from the results.
With this, we have reached the end of our demo. The order request received by our backend application was forwarded to the orchestrator worker. The orchestrator first called the inventory service and then the payment service. Within the inventory service, retryable and non-retryable errors, as well as maximum execution and retry durations, were demonstrated. In the payment service, asynchronously executable activities were showcased. We can now move on to the evaluation.
Result
Temporal stands out as a proven workflow engine thanks to its long-standing open-source development, wide range of use cases, and strong community. With its powerful retry mechanisms, asynchronous execution model, rich SDK support, and flexible deployment options such as self-hosted or cloud, it becomes not just an alternative but a serious architectural choice for teams looking to design complex, fault-tolerant workflows.
When to use Temporal?
- Long running, stateful flows
- Complicated retry, timeout mechanisms needed
- When durable orchestration is required across microservices.
It is not recommended for use in scenarios such as simple event streams, short-lived jobs, or high-throughput message queue workloads.
Advantages
- Durable, retryable workflows
- Native support for retry, timeout, cron, and saga patterns
- Code-first, powerful SDKs (Java, Go, Python, etc.)
- Resilient to operational failures
Disadvantages
- Learning curve
- Infrastructure requirement (Temporal cluster)
- Not suitable for high-throughput stream workloads
Differences Compared to Other Tools
- Zeebe (Camunda): BPMN-first diagrams vs. Temporal’s code-first approach
- Airflow: Suited for batch/data pipelines; not ideal for long-running, event-driven workflows
- Windmill: Focused on rapid prototyping and UI; Temporal provides production-grade reliability and security
This brings us to the end of the article. You can access the project code via this repository.
What has been your experience with Temporal, or have you explored alternative scenarios? I look forward to your feedback.